


I’ve been learning PowerApps recently and I was inspired by @8bitclassroom and @ScottDurow with their awesome PowerApps games. I wanted to learn PowerApps by doing something similar, I decided to make a 2D scroller game. During this time I’ve been focussing on areas that can improve the look and feel of applications and in this post I’ll show you how to make a continuous scrolling background from one image.

The Image
The image that we’re going to use will have to change depending on if you’re using landscape or portrait, so please keep in mind that this guide is following the portrait model.
The image size will need to be large so that you can have a lot of different changes over a period of time before it repeats. The image used in this example has a width of 3100px, a height of 1136px and I’m using Microsoft Flow documentation designs as I’m making a Flow based game.
You will need the last section of the image to be the same as the first section. Sections are split up into 690px (width), this is what the user will see when opening on a mobile or desktop device in portrait. If you look at the example image below the first and last sections are the same. We will talk about why this is needed in the next section.
Add the image to the screen you want the background on and rename it ‘Background’.
Example Image

The Timer
To move an image, rather than using a dummy table to use the forall loop in replace of a while loop, with standard coding, to iterate through the total number of pixels and increase the X position of our background until we’re done. We’re going to use the Timer and a little calculation to change our background X position to match that of the Timers value. This will then continuously move our image while the Timer is running.
Firstly, add a timer to your screen where you want the background image to move. Then rename it to ‘BackgroundTimer’.
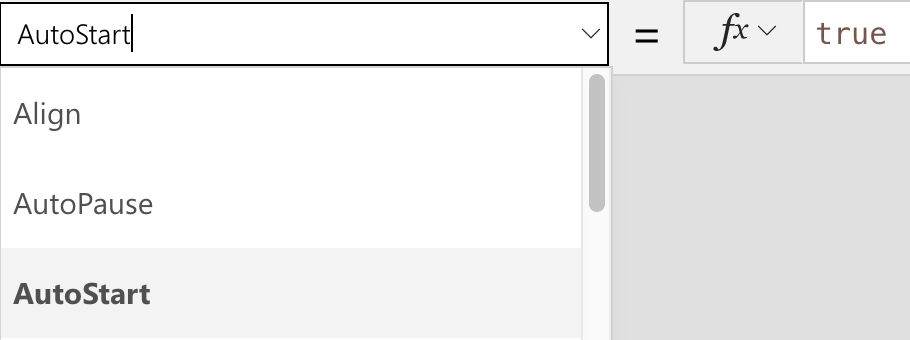
To initially move our image we need to set the Timer to automatically start. To do this, select the object (the BackgroundTimer) and then from the properties list (top left), select ‘AutoStart’ from t he dropdown. Then change the value from ‘false’ to ‘true’ as shown below:
When the screen with the timer opens, the timer will now automatically start and continuously run until the app is closed or the screen changes.
The timer will run until it is told to stop, but as we’re not recording time, we’re using it to move an object (our background) we want to state the total run time and also that we want it to repeat. Why? because we’re using one image we want the initial value to be reset once it hits a certain number. In our case for this example, we’re using an image of 3100px and at the time of 24 seconds (24100ms) if the image is at an X of -2410 (don’t worry too much about all these numbers right now they will be broken down in the next section) the image will be at our last section. This means if we then reset at this point, to the user it will appear as though nothing has happened when in-fact the background image X resets to 0. Hence, this is why the start and end of the image needs to be the same.
In the right column, while still having the timer selected, set the repeat section to on and also the duration to 21400. See below for the example settings:
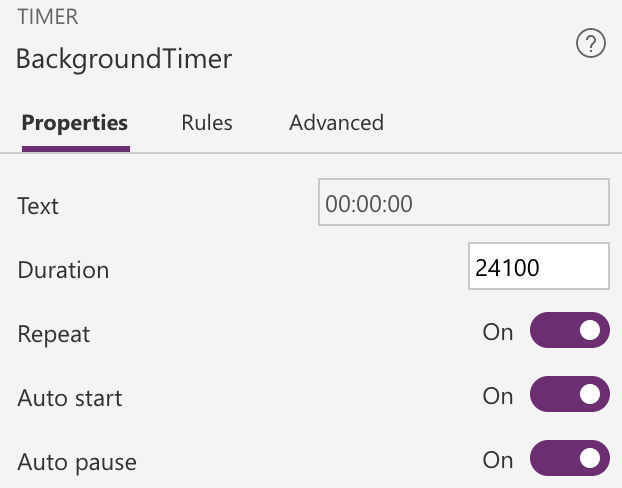
Now we have the timer named, running and repeating we want to hide this from the view of the user as it will just be used to control the background. To do this simple select disabled from the view option in the right column.
Moving The Background
Now we have everything set up to start moving our background. Select the previously named ‘Background’ image.
Now select the ‘X’ from the objects properties list (top left where we found the AutoStart of the Timer). Then we need to add a calculation to move the X position by using the timers value.
-(BackgroundTimer.Value/10)
We want to move the image left to we need to have the X number be a minus number. Therefore the calculation starts with a ‘-‘. Then we open parenthesis () as we want this calculation to be done before we place the minus sign onto it.
We take the BackgroundTimer.Value which will return in milliseconds and divide that by 10 to get the pixel amount per second value. This is what we were talking about previously when we stated that we’re using an image of 3100px and at the time of 24 seconds (24100ms) if the image is at an X of -2410 (24100/10 as per our calculation) to give us the X pixel amount.
Example
