


If you’ve spent any time designing and building with Copilot Studio, you’ll know that getting something working is only half the battle. Making it scalable, secure and easy to maintain takes time and effort, but communicating that between a team of people, more-often-than-not with individuals that may not be technical is also a hard task.
This is where the Power Platform Well-Architected Framework comes in. BUT first, what is a Well Architected Framework?
What is a Well Architected Framework?
A Well-Architected Framework (WAF) is used to assess, design, and improve the quality of a software solution or system. It’s a structured set of principles, best practices, and review tools. It helps you spot gaps early, guide the right trade-offs, and having a standard on how you review architecture across teams.
WAFs are used and published by major cloud providers like Microsoft (Power Platform, Azure), AWS & Google Cloud. Each has its own version, but the goal is pretty much the same: help teams design, review, and run solutions that follow best practices.
Where does the Well Architected Framework fit with the Power Platform?
How does it fit with the Power Platform? Well, it’s live on Microsoft Learn which you can find here, it gives teams a shared language to assess the quality of what they’re building, from Power Apps to Agents and a set of practices to improve it. I like to think of this as the architecture you talk about, not necessarily have every single small detail on.
For Copilot Studio, this means you can:
- Find issues before they become problems (early you find it the less cost involved in trying to fix it)
- Improve topic management, security and analytics
- Build agents that are not only smart and will improve your business but that are also sustainable
Example: The Custom Contact Centre
If you want to see what a good architected solution looks like, check out the Custom Contact Centre solution idea.
It shows how to create an agent-led experience that connects to a third party contact centre (not-Microsoft), handles multi-step interactions, and supports escalation to a live agent, following architectural principles that align with the Well-Architected Framework.

It’s a great example of how Copilot Studio can be used to deliver something real, measurable, and extensible across multiple channels.
Even the non-technical individuals in a discussion can understand the swim-lanes (such as data sources), the products or processes inside the lanes (such as Dataverse) and then in-turn what those products or processes are doing or holding.
The architecture document also knows numbers in green circles, this is to illustrate where the architecture begins from and ends at. In the example above, a customer would enter the solution at number 1, the Contact Center as a Service (CCaaS) platform, however, the employee would be entering from the Employee Portal at stage 3, via a Copilot Studio agent.
How to Get Started with the Well-Architected Framework for Copilot Studio
So, we’ve discussed what it is, we’ve looked at an example and now we’re ready to make our own, but first we should review what you need to know first. Luckily, you don’t need to be an enterprise architect to start applying this, anyone can do it, even those with little to no architecture skills. Here’s a simple way to approach it:
1. Start with the Five Pillars
Understand the core principles:
- Reliability – Does it work under stress?
- Security – Is access controlled and data safe?
- Operational Excellence – Is it monitored and maintainable?
- Performance Efficiency – Does it scale?
- Cost Optimization – Are you using what you need, and only that?
2. Review Your Agent with the Self-Assessment
Use the assessment tools and pillar-specific checklists to identify where you’re strong, and where you might need to tighten things up.
3. Learn from Solution Ideas
Use solution ideas like the Custom Contact Centre above as inspiration. See how everything fits, create the swim-lanes first, enter the products/solutions/processes into those swim-lanes, design how they’re going to interact and then see what you can refine to ensure they’re architected cleanly.
How to Build Your Own
Now we’re ready to build a Copilot Studio solution with a Well-Architected mindset and design our architecture diagram, here’s a starting guide:
- Define the outcome: What business process are you improving? What value will it provide?
- Map the conversation: Sketch out a dialog flow with key decision points.
- Create the swim-lanes: Separate the Processes, Products and Solutions into relevant sections.
- Connect to systems: Provide pathways of how the data is going to move and how users will interact.
- Add escalation: Build a seamless handoff to a human agent when/if needed.
- Implement logging & telemetry: Capture outcomes and errors with Application Insights or Power BI.
- Add journey numbers: Show where everything starts, where it ends, to make it easier for people to understand,
- Review with the framework: Use the Well-Architected checklist to refine and harden your solution.
You can also use the WAF Reference Architecture Diagram Template, which is a Visio or PowerPoint template that you can easily get started with, having the swim-lanes etc designed for you. You can find the template at: https://github.com/microsoft/PowerPnPGuidanceHub/tree/main/templates/architecture
Building an Example
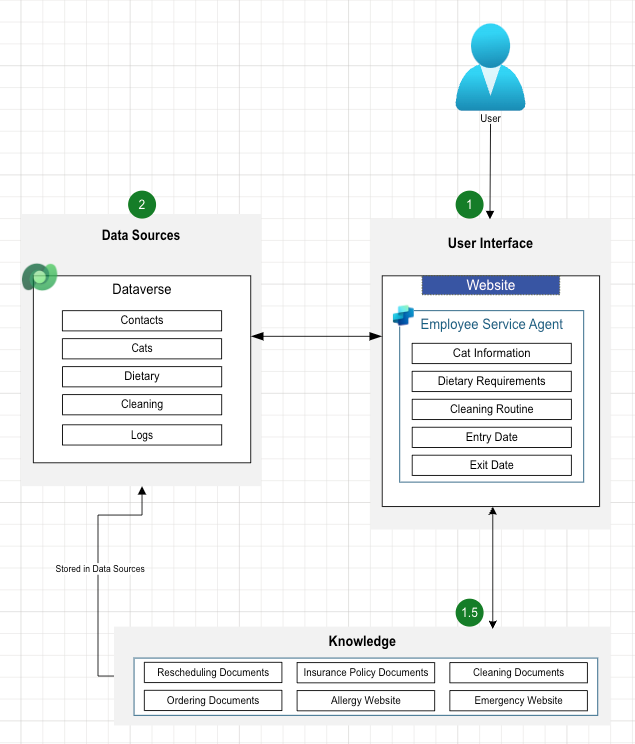
We will now build a simple example to show you how easy it is to get started. Firstly, the example we will use will be an agent for tracking cats in a cattery. The employee will be able to ask the agent about the cat’s that are currently checked in and staying with the cattery.
The example will simply use Dataverse tables, a Copilot Studio Agent and the Knowledge section. This will show us where the data will be stored, where additional knowledge sources will be added, where the agent will be and where the user will interact.
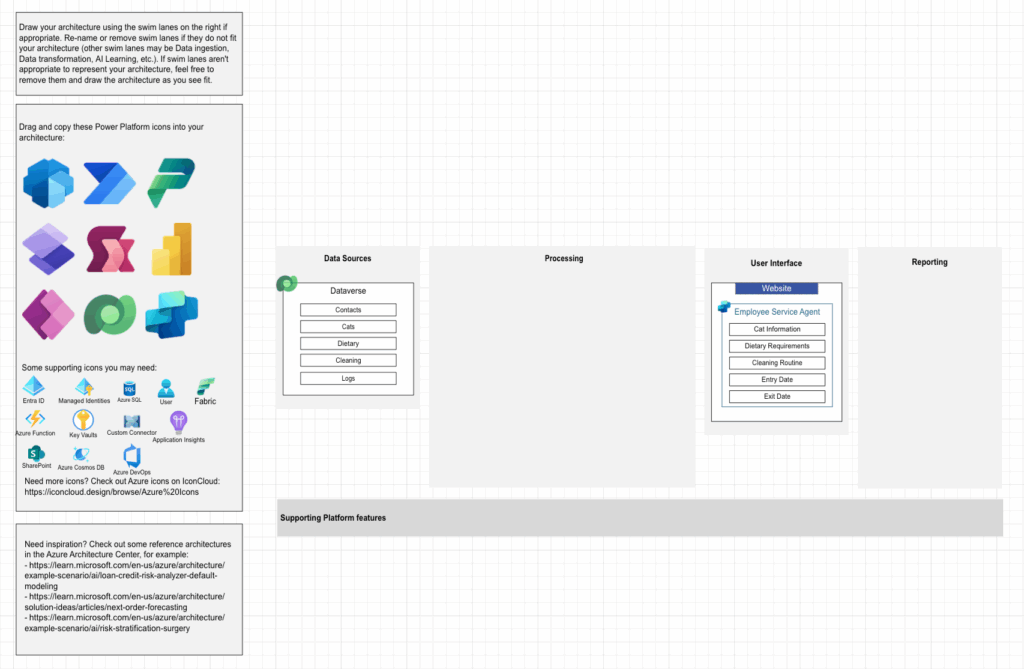
So let’s get started with the Vision template:

As you can see (from above) there’s the basic swim-lanes, icons and a generic layout to help you get started.
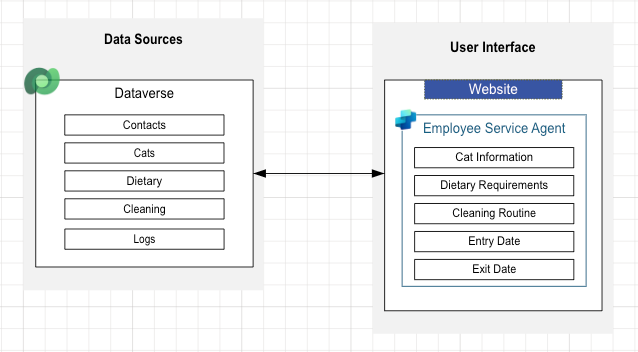
So here’s what I know; I want to connect Copilot Studio to Dataverse, so let’s start there.
I created the Copilot Agent section first in the User Interface swim-lane, as I pretended I had an interaction with a client and gathered information on what their employees will use the agent for; Cat Information, Dietary Requirements, Cleaning Routine, Entry Date and Exit Date. I also decided that it will sit on a website that is accessible via the employees, so I created a section for the website, then I added the Copilot Studio section inside.
This indicates that the Copilot Studio is sitting inside the website, and then added sections to articulate the requirements of the agent.
Then I moved onto the Dataverse section, I need to store data that reflects what the agent will have access to. I then created the Dataverse section within Data Sources, then added each of the tables I will either access or create.
To add visually to the diagram, I used colours for the lines around the boxes that match the products styling and then added icons, as it makes it a LOT easier to see.
Now I have to connect them, so I’m going to have to move the processing section out of the way as it’s not relevant to our example. Then I’ll add a connecting line, and use the arrows to show the flow of data, as I’ll possibly be populating data stored in Dataverse while also retrieving it, I’ll ensure the arrows are at both sides of the connecting line, to indicate the data flows both ways.
Now we have the Agent (User Interface) and Dataverse (Data Sources) created and connected, we can start to see our architecture diagram form. While we’re not using processes, we did decide that we will be using the Knowledge section of Copilot Studio to place documents or websites for the AI to have access to. As this doesn’t have a swim-lane from the template, we will just repurpose the Processing swim-lane to be Knowledge.
Once I’ve created the swim-lane, I then can add the knowledge documents or websites, these do not have to be file specific, but an overview of areas that they will cover, such as Cleaning Documents may have 10 files, but the overall “Cleaning Documents” indicate that they will exist here, and be accessible via the agent.
After that has been completed, you then need to connect the Knowledge section to the agent, but also Dataverse, as the information is actually being stored here.
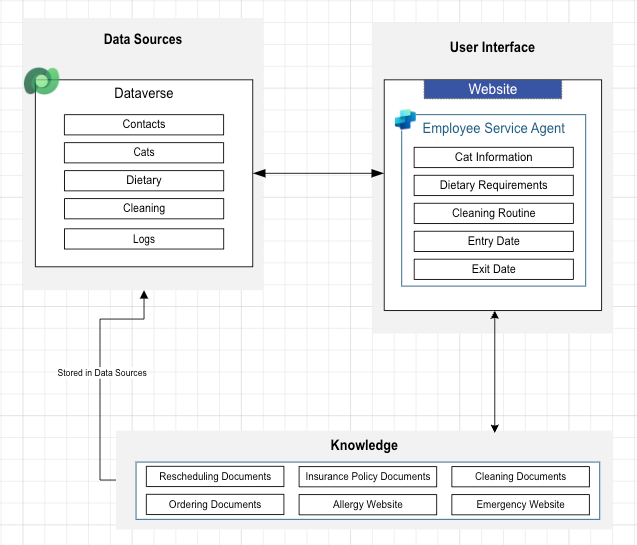
Now we have an idea of what data we’re storing, what our user interface is and where the agent will be, what the agent will be used for, what additional “knowledge” (documents/websites etc) the agent will have access to and how it all connects.
The one thing we do not have is where the user will fit into this architecture. It’s important to show this, as it’s a key-access point, but it’s also important to show this when trying to explain the flow to someone that may not be technical, because if you did not understand how data flows work, how connections work etc, the above diagram looks like it just goes round in circles.
So, what do we know about the user? The user is going to be an employee, they have an employee website and that employee will be accessing the agent via the website. Let’s add that to the diagram as well.
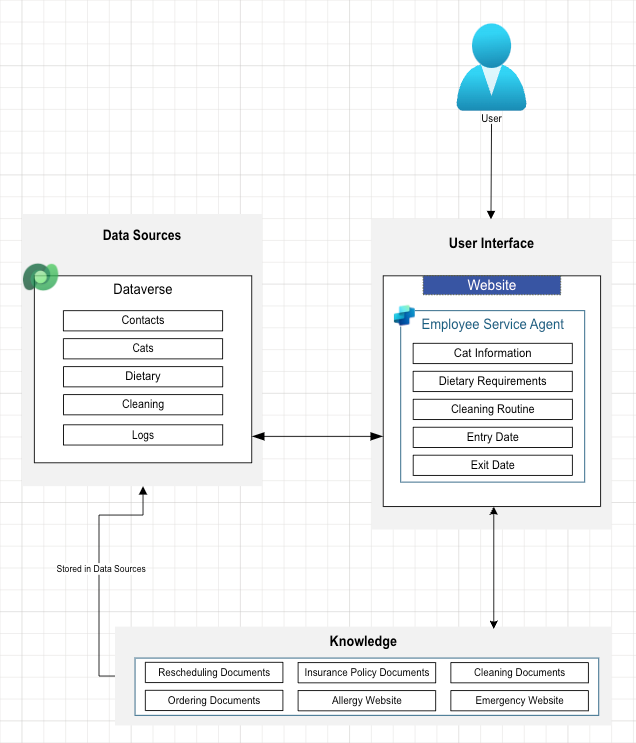
Our diagram is now complete, in terms of structure, we can see where the user will enter the flow (via the user interface, and in-turn the agent via the website). We know that the agent will have access to documents and websites for it’s AI knowledge and that it will connect to Dataverse to enter and retrieve data.
To then conform to the WAF architecture, we should add a numbering system, to help individuals understand the flow of our path.
The image below shows the experience begins at the UI, via the website and agent, and then via the Copilot Studio Agent, it has access to the knowledge sources, but then connects to the data source, Dataverse.
We have now completed our very simple example of creating a Well Architected Framework diagram for our simple agent, as you can probably already see, you can easily expand this to fit your needs from small customer requirements to enterprise.
Remember, it is used to assess, design, and improve the quality of your solutions, while being able to communicate clearly with all parties involved, including those that are not technical. You can of course then move into a more technical solution architecture diagram if you wish to do so.
Contribute to Microsoft Docs
You can also contribute diagrams to be used as examples to the Microsoft team, Manuela Pichler on GitHub has a link (https://github.com/microsoft/PowerPnPGuidanceHub/tree/main/templates/architecture) explaining how you can do this, my advice would be remove anything with name-specific information (such as your company name) to make it more generic and easily usable before submitting!