


This Blog and Video post will explain how to get data from Adaptive Cards in Microsoft Teams. We will look at an easy to follow example, add new input elements and see the data in action.
Where to start
If you would like an introduction to Adaptive Cards, check out this blog post: https://www.flowjoe.io/2021/05/25/getting-started-with-creating-adaptive-cards-for-microsoft-teams/
The best place to start when looking to create an Adaptive Card is the designer website. You can find the web address here: https://adaptivecards.io/designer/. When the website is open, you will see an example card that contains several elements. This will give you a good look and feel to what an Adaptive Card is, if you have not used these before. There’s a video that shows you a step-by-step method for this or alternatively there is a text based walkthrough below:
Video
If you’re a visual learner or just prefer videos, then check out the video of this below:
Walkthrough
To begin, we will using this code for our example Adaptive Card (the final code from the video is at the end of the post):
{
    "type": "AdaptiveCard",
    "$schema": "http://adaptivecards.io/schemas/adaptive-card.json",
    "version": "1.2",
    "msTeams": {
        "width": "full"
    },
    "body": [
        {
            "type": "TextBlock",
            "text": "Adaptive Card Example",
            "wrap": true,
            "size": "large",
            "weight": "bolder",
            "id": "title"
        },
        {
            "type": "Input.Text",
            "placeholder": "Provide your thoughts",
            "separator": true,
            "isMultiline": true,
            "id": "thoughts"
        },
        {
            "type": "ActionSet",
            "separator": true,
            "actions": [
                {
                    "type": "Action.Submit",
                    "title": "Submit",
                    "style": "positive",
                    "id": "submit"
                }
            ]
        }
    ]
}
Sending the Card
To retrieve data, we need to ensure that our input elements, the Input.Text in our example, uses relevant ID’s. This is going to provide the identification that will make our lives a lot easier when we start pulling apart the data.
These ID’s will be represented in the dynamic data section of Power Automate, so make sure they’re good! In our example, we use the ID of ‘thoughts’ as we’re asking for the users thoughts.
We are now going to open Power Automate and begin the Adaptive Card to Microsoft Teams process.
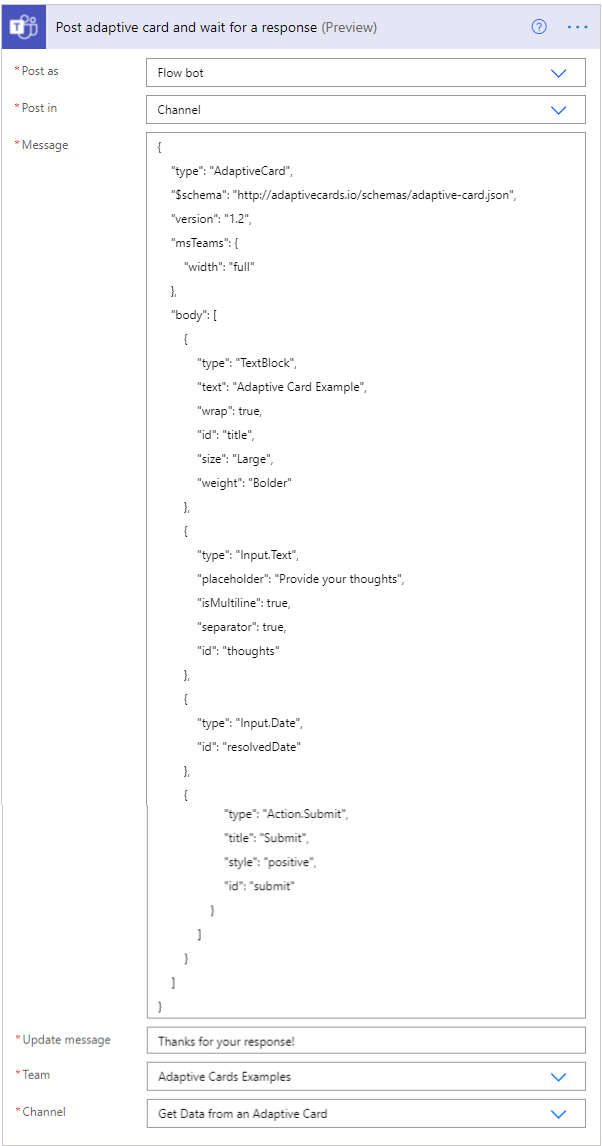
Now, to begin, let’s create a Flow that uses a manual trigger. We will then add a ‘Post adaptive card and wait for a response’ action. Within this action, we will set the ‘Post As’ to be the Flow Bot and we want to set ‘Post In’ to channel. We can then paste our Adaptive Card into the ‘Message’ section.
We need to focus on the ‘Update Message’ section, as this is what will be replacing our Adaptive Card on a submit action. You need to make sure that the message is clear to the user that they have responded, as they will not be able to make changes or respond again.
We then can select the relevant ‘Team’ and ‘Channel’ we wish to send our Adaptive Card to.
Getting the Data
Now we have our Flow all set up, we can run a test. This will send the Adaptive Card to the selected Team and Channel but rather than continuing, much like the approvals process, it will sit there waiting. The flow will look like:

We can then see in Microsoft Teams the Adaptive Card:
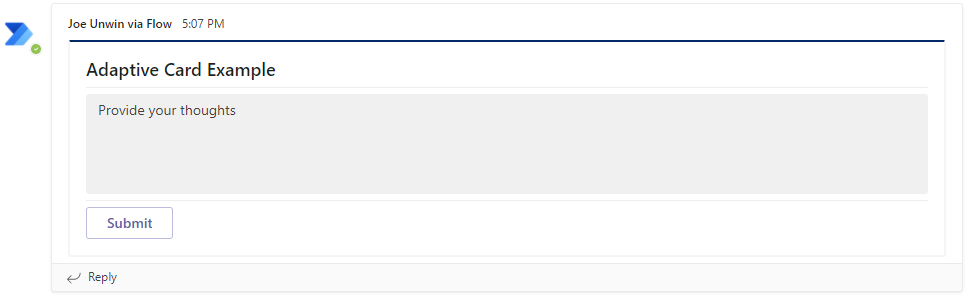
We then want to provide some information into our input box and press the submit button. This will take the information from our input elements and pass them back to Power Automate.
Now, on Power Automate, we will see the Post Adaptive Card action, and our input information will be added as shown below:
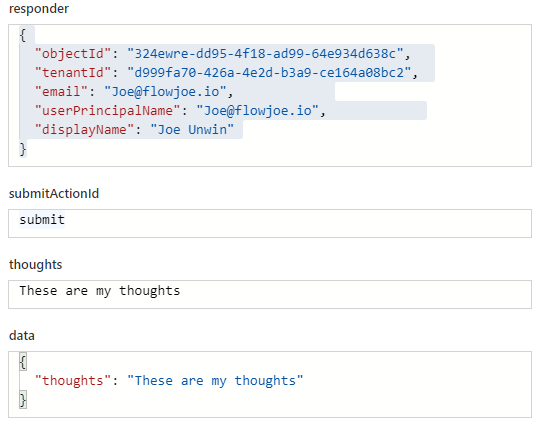
The action will automatically created a dynamic field, in our example ‘thoughts’, and pass that information in. We also have access to the responder information if we wish to use that. You can now use the information you have got from your Adaptive Card within Power Automate, check out the image below to see the dynamic data being used in a Compose action:
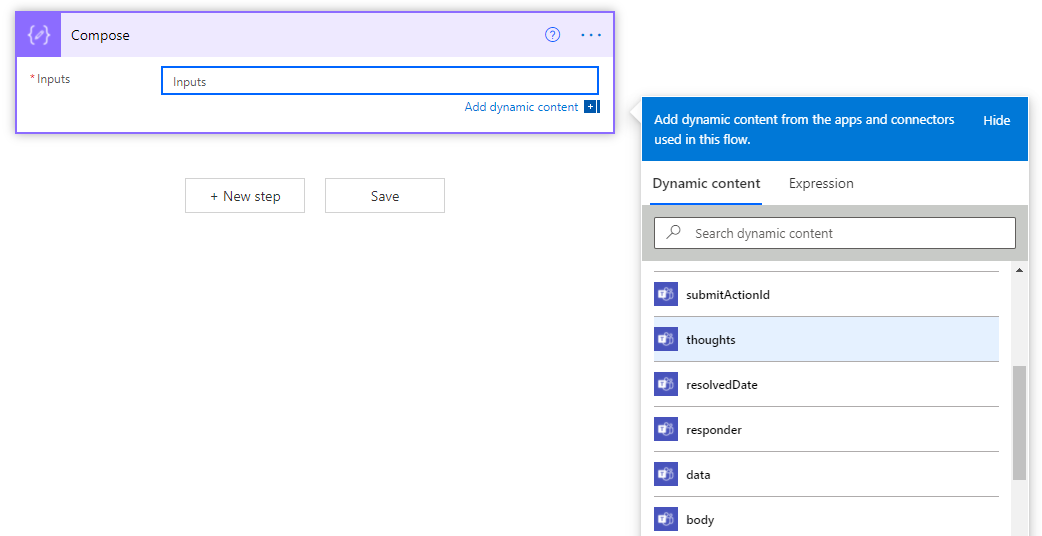
*NOTE*: If you’re experiencing the data not showing up in the dynamic content you can use: outputs(‘Post_adaptive_card_and_wait_for_a_response’)?[‘body/data/thoughts’] and replace ‘thoughts’ with the id of your element.
Extending the Demo
You can see the final code from the video below:
{
    "type": "AdaptiveCard",
    "$schema": "http://adaptivecards.io/schemas/adaptive-card.json",
    "version": "1.2",
    "msTeams": {
        "width": "full"
    },
    "body": [
        {
            "type": "TextBlock",
            "text": "Adaptive Card Example",
            "wrap": true,
            "id": "title",
            "size": "Large",
            "weight": "Bolder"
        },
        {
            "type": "Input.Text",
            "placeholder": "Provide your thoughts",
            "isMultiline": true,
            "separator": true,
            "id": "thoughts"
        },
        {
            "type": "Input.Date",
            "id": "resolvedDate"
        },
        {
            "type": "ActionSet",
            "separator": true,
            "actions": [
                {
                    "type": "Action.Submit",
                    "title": "Submit",
                    "style": "positive",
                    "id": "submit"
                }
            ]
        }
    ]
}